Easy Cherry Bars: Bake Nostalgic Comfort for Any Occasion
There's an undeniable magic in certain desserts – a power to transport you back to simpler times, evoking cherished memories with every bite. For many,
cherry bars hold that special place. The vibrant, sweet-tart burst of ripe cherries, nestled between a tender, buttery shortbread crust and a crumbly streusel topping, isn't just a treat; it's a warm hug from the past. Imagine the comforting aroma of vanilla and cherries wafting from the oven, reminiscent of grandmother's kitchen, holiday gatherings, or bustling bake sales where these irresistible squares were always the first to disappear. This article isn't just about a recipe; it's about recreating that heartwarming, nostalgic experience with an incredibly
easy cherry bars recipe that delivers bakery-style deliciousness without any stress. Whether you're whipping up a batch for a casual family dessert or need a dependable showstopper for a bigger event, these bars are your ticket to simple, joyful baking.
Why Cherry Bars Are Your Ultimate Go-To Dessert
When it comes to choosing a dessert, especially for a crowd or a special gathering,
cherry bars consistently rise to the top of the list. Their universal appeal and practical benefits make them an undeniable winner.
Effortless Elegance for Every Baker
One of the most appealing aspects of cherry bars is their straightforward nature. You don't need advanced baking degrees or specialized equipment to achieve impressive results. The process typically involves a simple press-in crust, a generous layer of cherry filling, and a delightful crumble topping. This ease makes them perfect for beginner bakers looking for a rewarding project, or seasoned pros wanting a quick yet satisfying treat. The beauty lies in their rustic charm – a slightly uneven crumble or a perfectly golden edge only adds to their homemade appeal, proving that truly delicious food doesn't have to be complicated.
A Crowd-Pleasing Powerhouse
Planning for a school fundraiser, a church potluck, a backyard barbecue, or a large family reunion? Look no further.
Cherry bars are inherently designed for sharing. Their firm yet tender texture makes them easy to cut into neat squares, perfect for serving a large group. They're adored by people of all ages, from toddlers to grandparents, ensuring there's something everyone will love. Plus, the convenience of baking them in a large sheet pan means you can easily scale up the recipe to feed dozens without much extra effort. For those really big events, explore our
Ultimate Cherry Bars for a Crowd: Large Batch Recipe Guide for expert tips on scaling.
The Make-Ahead Marvel
Life gets busy, and sometimes the best desserts are those that can be prepared in advance. Cherry bars are incredibly make-ahead friendly. You can bake them a day or two before your event, allowing the flavors to meld beautifully. They store wonderfully at room temperature or in the refrigerator, making them an ideal choice for busy hosts. This feature not only saves you precious time on the day of your event but also helps manage stress, letting you focus on other preparations. For detailed strategies on prepping and storing, check out our guide on
Portable & Perfect: Make-Ahead Cherry Bars for Your Next Potluck.
Budget-Friendly Brilliance and Versatility
You don't need exotic ingredients to create something spectacular.
Cherry bars utilize readily available and affordable components like flour, butter, sugar, and canned cherry pie filling. This makes them a smart choice for delicious baking that won't break the bank. Furthermore, while classic cherry is undeniably king, these bars offer a versatile canvas for creativity. Feel free to experiment with different fruit fillings – raspberry, blueberry, apple, or even mixed berry – to suit your taste or the season. You can also customize the crust or topping by adding nuts (pecans or walnuts), a sprinkle of cinnamon, a hint of citrus zest, or even a drizzle of white chocolate after cooling for an extra touch of flair.
Crafting the Perfect Cherry Bar: A Step-by-Step Journey
Let's demystify the process of baking these delightful treats. While precise measurements would be in a dedicated recipe, understanding the components and their roles is key to success.
The Buttery Foundation: Crust and Topping
The magic of cherry bars begins with their unique dough, which serves a dual purpose: a sturdy, tender base and a crumbly, golden streusel topping. Typically, this dough combines all-purpose flour, baking powder for a slight lift, a pinch of salt to balance the sweetness, softened unsalted butter for richness, powdered sugar for a melt-in-your-mouth texture, and a generous splash of vanilla extract for that classic, comforting aroma.
To prepare, you'll first combine the dry ingredients, then cut in the softened butter until crumbly. The powdered sugar and vanilla are then mixed in until a soft, pliable dough forms. A crucial step is to reserve about one-third of this mixture for the streusel topping. The remaining two-thirds are pressed firmly and evenly into your prepared baking pan. For a large batch, a half-sheet pan (18x13 inches) or two 9x13-inch pans work perfectly. Greasing the pan and lining it with parchment paper is highly recommended for easy removal and clean-up. This base then gets a quick initial bake until lightly golden, creating a strong foundation for the delicious filling.
The Luminous Cherry Heart: Filling with a Twist
Once the crust is partially baked, it's time for the star of the show: the cherry filling. While you can certainly use fresh or frozen pitted cherries (which require a bit of cooking with sugar and a thickener like cornstarch to achieve a gooey consistency), high-quality canned cherry pie filling is an excellent, time-saving option that delivers consistent results and that signature shiny, luscious texture.
To elevate the flavor beyond just "cherry," a secret ingredient often recommended is almond extract. Just a tablespoon or so, mixed into the cherry filling, dramatically enhances the fruit's natural notes, adding a depth that truly sets homemade cherry bars apart. Spread this vibrant, glistening filling evenly over the warm, pre-baked crust. The warmth of the crust helps the filling settle and ensures a seamless bond between layers.
The Crumbly Crown: Streusel Topping and Final Bake
Finally, the reserved dough mixture comes into play as the streusel topping. Gently crumble this dough over the cherry layer. Don't worry about being too precise – the uneven, rustic texture is part of the charm and appeal of these bars. The crumbles will bake into golden, buttery nuggets, providing a delightful textural contrast to the soft filling and tender crust.
Return the pan to the oven for the final bake. This second stage allows the streusel to brown beautifully, the cherry filling to bubble and set, and the entire bar to cook through. You'll know they're done when the topping is golden brown and the edges of the bars are set.
Tips for Cherry Bar Perfection & Serving Suggestions
Achieving perfection with your
easy cherry bars is within reach with a few expert tips:
*
Butter is Key: Ensure your butter is truly softened for the dough. This allows for easier mixing and a more tender, uniform crust and streusel.
*
Don't Overbake: While a golden crust and topping are desirable, overbaking can lead to dry bars. Keep an eye on them during the final bake; the filling will continue to set as it cools.
*
Cool Completely: Patience is a virtue here! Allow the bars to cool completely, preferably for several hours or even overnight, before cutting. This ensures clean, neat squares and prevents the filling from oozing out. Chilling them in the refrigerator can speed up the process and make cutting even easier.
*
Almond Extract Magic: If you're using canned pie filling, do not skip the almond extract. It transforms the flavor from good to absolutely incredible.
*
Cutting Technique: For perfect squares, use a sharp, warm knife. Wipe the knife clean between cuts to prevent sticking and maintain neat edges.
*
Storage: Store cooled bars in an airtight container at room temperature for up to 3 days, or in the refrigerator for up to a week. They also freeze well for longer storage.
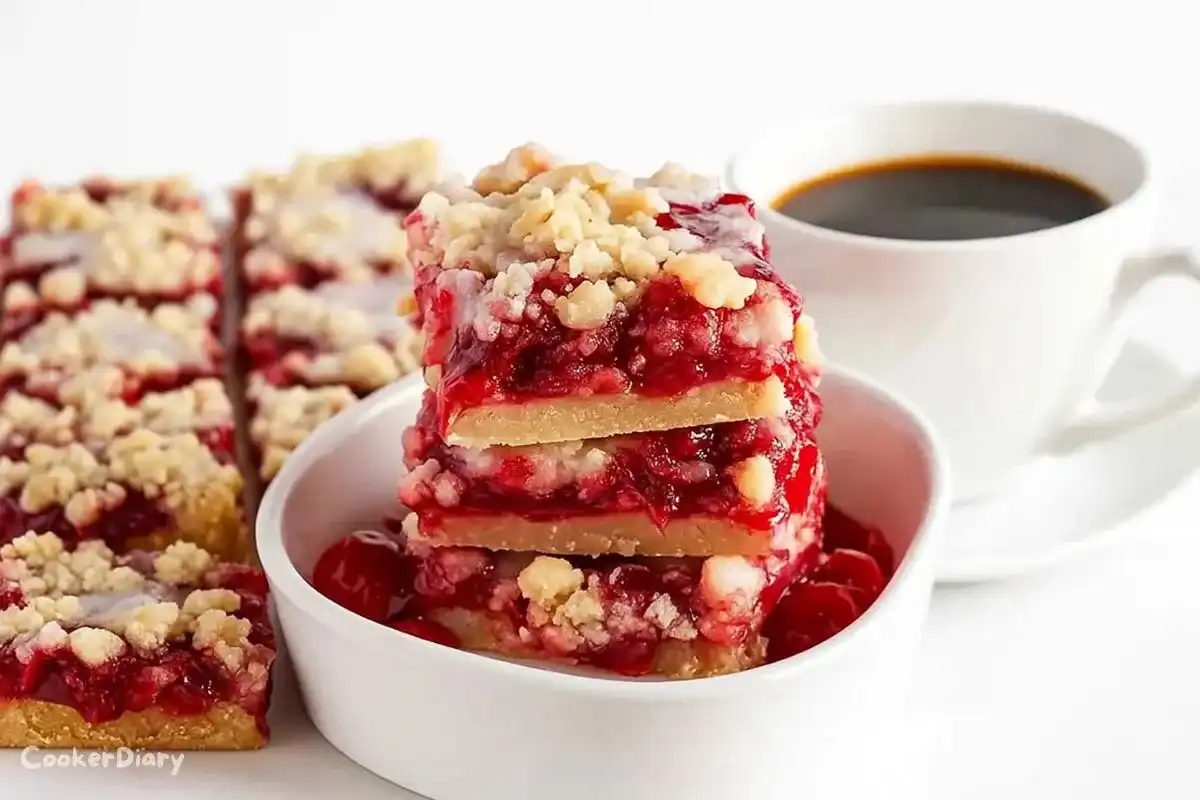
Serve your
cherry bars as a delightful afternoon snack with a cup of coffee or tea, a charming dessert for a potluck, or a comforting treat after a family dinner. For an extra indulgence, warm them slightly and serve with a scoop of vanilla bean ice cream or a dollop of whipped cream. A dusting of powdered sugar just before serving adds a touch of elegance.
Conclusion
From the comforting aroma filling your kitchen to the joyful smiles around the table, baking
easy cherry bars is an experience that truly delivers on its promise of nostalgic comfort. These simple yet sensational squares embody everything we love about homemade baking: ease, versatility, and an irresistible taste that appeals to everyone. Whether you're chasing a childhood memory, need a reliable crowd-pleaser, or simply crave a sweet moment of your own, these cherry bars are a testament to the fact that the most cherished treats are often the simplest. So go ahead, preheat that oven, and bake a batch of pure happiness – your taste buds, and your guests, will thank you.